If you want smoother prints, fewer jams, and better handling of flexible filaments, a direct‑drive extruder upgrade can make a big difference. I’ll walk you through five top kits for Ender and similar printers, explain why each stands out, and point out what to watch for when choosing one. Keep this in mind: the right upgrade depends on your printer, filament habits, and how far you want to tinker.
Creality Ender 3 Direct Drive Upgrade Kit (42-40 Stepper Motor, Hotend, Extruder, Fan)
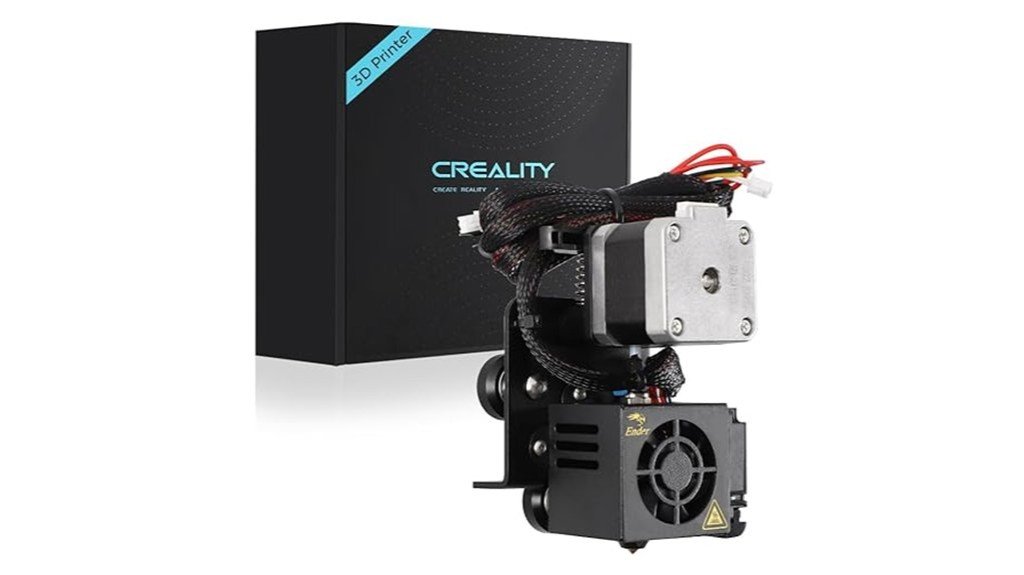
If you own an Ender 3, Ender 3 V2, or Ender 3 Pro and want to print flexible filaments like TPU without fighting jams, the Creality Ender 3 Direct Drive Upgrade Kit is a smart, practical choice. You get a sturdy all-metal extruder, a 42-40 stepper motor, hotend, fan, cables, tools, and clear instructions. Installation takes about 30 minutes, but you’ll need to change E-steps from 93 to 424.9 and maybe flash firmware. Prints show fewer clogs, better TPU handling, and faster heat-up. Be careful wiring the board, and expect good Creality support and a one-year warranty.
Best For: Users of Ender 3 / Ender 3 V2 / Ender 3 Pro who want reliable, easy-to-install direct drive capability to print flexible filaments (like TPU) with fewer jams and improved print quality.
Pros:
- All-metal direct drive extruder and 42-40 stepper motor improve filament control, reducing clogs and enabling reliable TPU printing.
- Relatively quick ~30-minute installation with included tools, cables, and instructions.
- Noticeable performance gains — faster heating, better part cooling, and improved print quality; backed by Creality support and a one-year warranty.
Cons:
- Requires firmware adjustments (E-steps from 93 to 424.9) and possibly flashing custom firmware, which may be challenging for beginners.
- Some users report wiring/electrical concerns and potential for noisy cooling fan; careful installation is needed to avoid board damage.
- Extruder lacks a lever/tension release and may need manual tweaks for alignment and tensioning.
Creality Sprite All-Metal Direct Drive Extruder Upgrade Kit (80N Stepper Motor) for Ender 3 Series 3D Printers
The Creality Sprite All-Metal Direct Drive Extruder Upgrade Kit is a great pick if you want stronger, more reliable filament feeding on an Ender 3 series printer—especially for flexible or high-temp materials. You get an all-metal hotend with a titanium heatbreak, dual-drive gearing, and an 80N stepper for firm, consistent extrusion up to 300°C. Installation touches the control board and may need wiring tweaks or a 32-bit board for best results, so be careful. It isn’t compatible with BL-touch style probes. Users report smoother prints, fewer jams, and less maintenance once it’s set up right.
Best For: Makers and Ender 3 series owners who want reliable direct-drive extrusion for flexible or high-temperature filaments and are comfortable with moderate firmware/hardware tweaks.
Pros:
- All-metal hotend with titanium heatbreak and 300°C support enables a wide range of filaments (PLA, TPU, PETG, ABS, high-temp materials).
- Dual-drive gearing and 80N stepper provide strong, consistent filament grip—fewer jams and better retraction control.
- Improved cooling and build stability (dual fans, flow-field mechanics) reduce maintenance and improve print quality.
Cons:
- Installation requires accessing the control board and may need wiring changes or a 32-bit board; not beginner-friendly.
- Not compatible with 3D-touch/BL-touch/CR-touch probes, which may limit bed leveling options.
- May require troubleshooting for specific control boards (e.g., BIGTREETECH SKR Mini) and occasional tuning after installation.
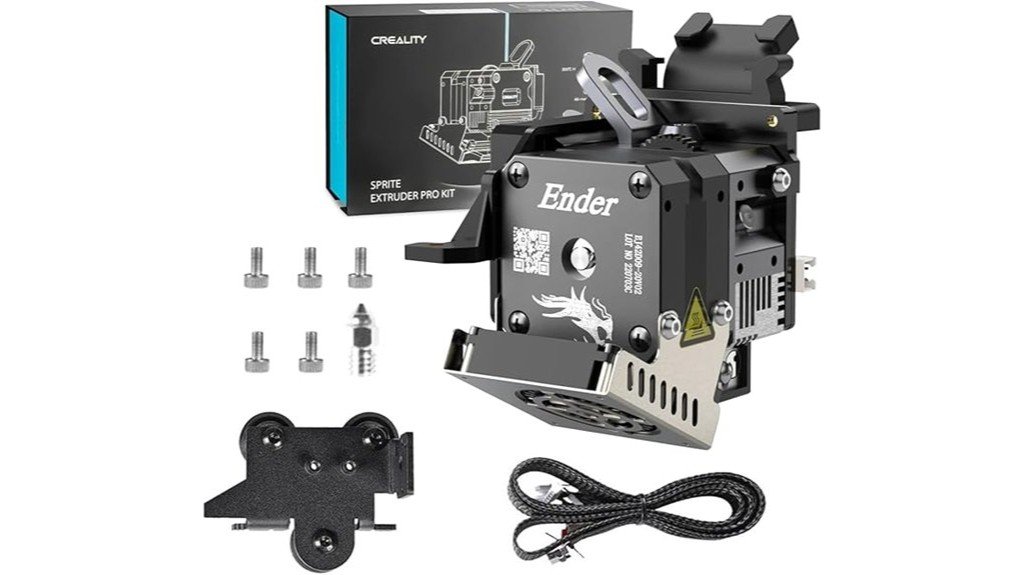
Creality Sprite Extruder Pro All-Metal Direct Drive Extruder Kit for Ender 3 Series (Supports 300°C)

For anyone running an Ender 3 series who wants a reliable, high-temp direct-drive upgrade, the Creality Sprite Extruder Pro is a smart pick — especially if you print flexible filaments like TPU or want to push hotter materials up to 300°C. You’ll get an all-metal extruder and hotend combo with a compact, lightweight design that swaps into Ender 3, 3 V2, 3 Pro, and 3 MAX machines. Dual-tooth gears and a 3.5:1 ratio deliver up to 80N of force for gentle, precise feeding. Dual fans, a silent metal-covered fan, BLTouch cable, firmware, and round-the-clock support finish the package.
Best For: users of Ender 3 series printers who want a compact, high-temperature direct-drive upgrade for reliably printing flexible filaments (TPU) and hotter materials up to 300°C.
Pros:
- All-metal direct-drive extruder + hotend combo supports up to 300°C and improves flexible filament handling.
- Dual-tooth gears with 3.5:1 ratio provide up to 80N force for precise, non-damaging filament feed and retraction.
- Compact, lightweight design with dual cooling fans, silent metal-covered fan, BLTouch cable, firmware availability, and 24/7 support.
Cons:
- Designed specifically for Ender 3 series—may require modifications or be incompatible with other printers.
- Short BLTouch/CR Touch cable may not reach some setups without extension or rerouting.
- All-metal hotend can increase heat creep risk on long prints without careful cooling/temperature management.
Creality Sprite Extruder Pro Upgrade Kit for Ender 3 Series and CR-10 3D Printers
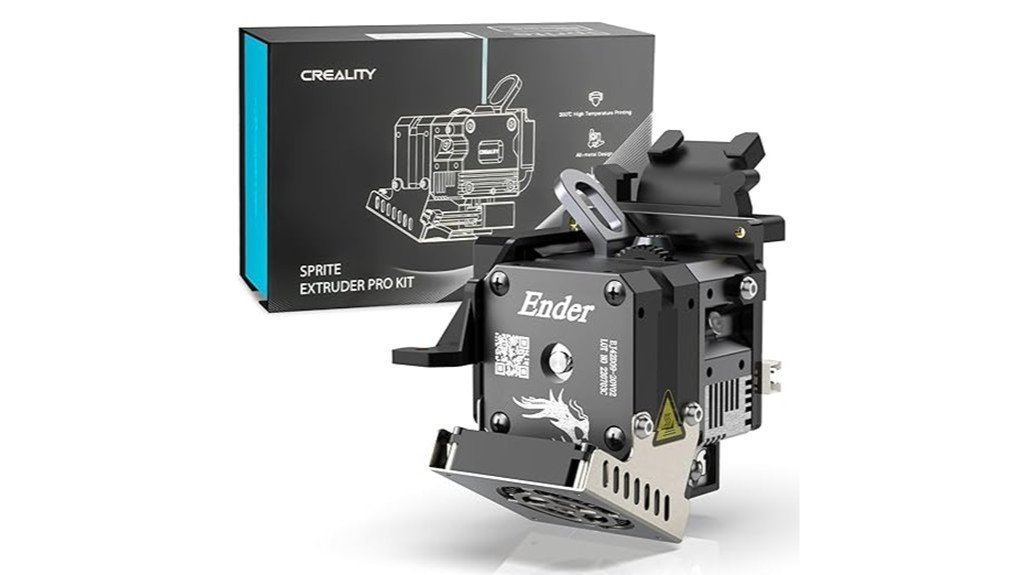
Creality’s Sprite Extruder Pro is a solid pick when you want to convert an Ender 3-series or CR-10 into a true direct-drive workhorse that handles flexible filaments without drama. You get an all-metal hotend and dual-gear feed that pushes up to 80N, so TPU, PETG, and ABS behave better and prints can run faster. Installation is generally quick, but you’ll need to flash firmware for some Neo models and tweak E-steps, retraction, and PID. Watch thermistor wiring and mounting screws, keep spares, and follow Creality’s support if you hit snags — they respond promptly.
Best For: makers with Ender 3-series or CR-10 printers who want a reliable direct-drive upgrade for printing flexible filaments and higher-temperature materials.
Pros:
- All-metal hotend and dual-gear direct-drive feed (3.5:1, up to ~80N) improves handling of TPU, PETG, ABS and enables faster, more precise extrusion.
- Broad compatibility with Ender 3/3 V2/3 Pro/3 Max/3 S1/CR-10 Smart Pro (and Neo models with 4.2.7 board + firmware) and includes efficient dual-fan cooling.
- Generally quick installation with Creality lifetime tech support and clear recommendations for calibration (E-steps, retraction, PID).
Cons:
- Neo models require firmware flashing (and extra bracket on some V2 Neo), and Ender 3 S1/CR-10 Smart Pro only support extruder components (no mounting/wiring compatibility).
- Some users report fragile thermistor wiring and occasional mounting screw stability issues — spares and careful checking recommended.
- Converting from Bowden to direct drive necessitates slicer profile changes and thorough re-tuning (retract, probe offsets, nozzle height).
BIQU H2 V2S Dual Gear Direct Extruder for 1.75mm 3D Printers (Compatible with BIQU BX, Creality Ender/CR, Anycubic Mega S, Geeetech, Prusa i3)
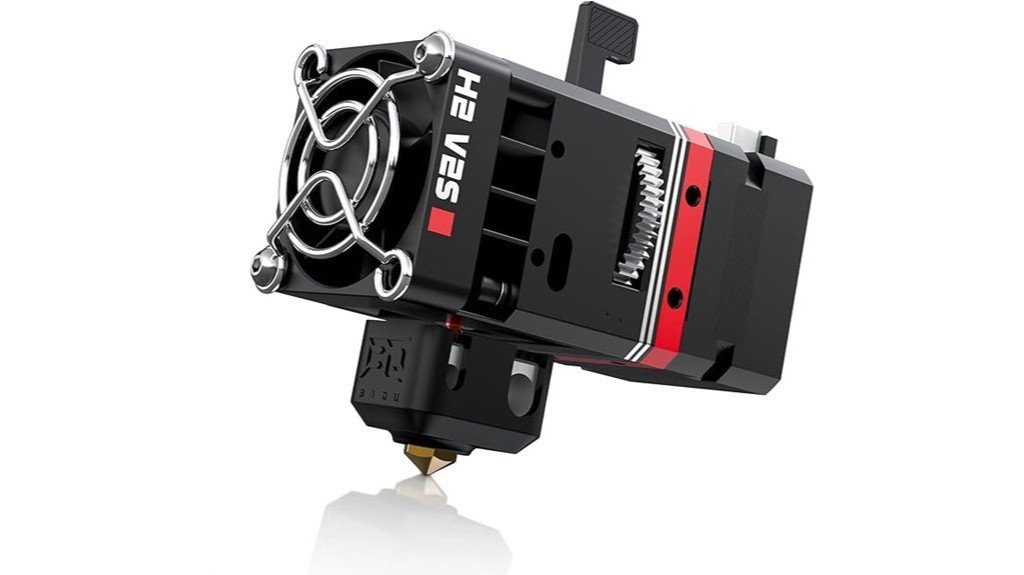
If you want a reliable upgrade that keeps the extruder light and powerful, the BIQU H2 V2S is a smart pick — especially for hobbyists who tinker with multiple filament types. You’ll notice it’s just 195g, about 34% lighter than typical 300g units, which helps accuracy and reduces vibration. The dual-gear 7:1 system delivers 770N of force for consistent feeding and clean retractions. You can fine-tune filament tension with a screw, so ABS, PLA, PET and others print better. Aluminum construction and a bi-metal heat break let you run up to 270℃, and mounting holes accept sensors or fans.
Best For: Hobbyist and DIY 3D printer users who want a lightweight, high-force direct-drive extruder upgrade that handles multiple filament types and supports higher-temperature printing.
Pros:
- Lightweight aluminum build (195g) reduces vibration and improves print accuracy compared to typical 300g extruders.
- Dual-gear 7:1 drive provides strong 770N extrusion force for consistent feeding and clean retractions.
- Adjustable filament tension, bi-metal heat break, and silicone sock enable reliable printing with ABS, PLA, PET, and up to 270℃ for high-temp filaments.
Cons:
- Compatibility may require mounting or firmware adjustments for some printer models despite broad support (BX, Ender/CR, Anycubic Mega S, Geeetech, Prusa i3).
- 270℃ max is sufficient for many filaments but may be limiting for very high-temperature materials requiring higher limits.
- Installation and tuning (tension screw, possible sensor/fan mounting) can be fiddly for beginners.
Factors to Consider When Choosing Direct Drive Extruder Upgrades
When picking a direct-drive extruder upgrade, you’ll want to check what filament types it supports and the hotend’s temperature limits so you don’t get stuck trying to print materials it can’t handle. Also consider the extruder drive style and stepper motor torque, since those affect how reliably the filament is pushed and how well flexible or abrasive filaments feed. Don’t forget cooling and airflow, because proper heat control keeps prints consistent and prevents jams or thermal issues.
Filament Compatibility Range
Choosing the right direct-drive extruder upgrade can make a big difference in what filaments you’ll be able to print reliably, so start by matching the upgrade’s stated compatibility to the materials you plan to use most. You’ll want an extruder that lists PLA, PETG, TPU, and ABS if you like variety. If you expect to print flexible filaments, pick a unit that specifically says it supports flexible materials — those need different feeding paths and sometimes a tighter wrap. Dual-gear feeders help grip filament better and cut down on slips and jams across materials. Adjustable tension is useful too; you can fine-tune pressure for different diameters and softness. Finally, check the extruder’s temperature resistance so it covers the filaments you’ll try.
Hotend Temperature Limits
Hotend temperature limits are one of the first specs you should check because they directly decide which filaments you’ll be able to print reliably. If you want to move beyond PLA’s 190–220°C comfort zone, pick a hotend rated for higher temps — common high-temperature options run from about 240°C up to 300°C for specialized units. That opens doors to nylon, polycarbonate, and other high-performance filaments that often need 260°C or more. Also pay attention to the hotend’s construction: materials with good thermal conductivity help keep temperatures stable, which really matters when you’re printing hot for hours. Finally, make sure the hotend has proper cooling and heat-break design to prevent heat creep; otherwise prints can fail even if the thermometer looks fine.
Extruder Drive Type
1 clear advantage of switching to a direct drive extruder is that it brings the motor right next to the hotend, so you get much better control over filament feeding and retraction—this matters especially if you plan to print flexible or specialty filaments that hate long Bowden tubes. When choosing an extruder drive type, look for dual-gear designs that grip filament firmly and cut down on jams. Many models push higher extrusion force—some up to about 80N—so you’ll handle soft and springy materials more reliably. Gear ratios around 3.5:1 help the motor work efficiently and give precise feed and withdrawal. Remember installation usually means firmware tweaks: recalibrate E-steps and adjust PID to match the new hardware for smooth, consistent prints.
Stepper Motor Torque
Think of the stepper motor as the muscle of your direct-drive extruder: it needs enough torque to push and retract filament cleanly, especially when you’re working with soft or springy materials like TPU. Torque rating matters because higher torque reduces jams and improves retraction control, so prints with fine details come out cleaner. For most users, a motor around 80N provides reliable performance across PLA, PETG, and flexible filaments without overkill. Direct-drive layouts already help by shortening filament path and lowering required force, so you don’t need an enormous motor. Still, if you tackle complex prints or fast retractions, stepping up torque will pay off in consistency. Choose a motor that matches your filament choices and printing speed goals.
Cooling and Airflow
Because heat control makes or breaks print quality, you’ll want to pay close attention to cooling and airflow when upgrading a direct-drive extruder. Effective cooling stops the hotend from overheating and keeps temperatures steady, which matters more when you push filaments toward 300°C. Look for designs with dual fans—they boost heat dissipation and help your prints stay stable during long jobs. Manage airflow carefully: short, well-angled ducts move air where it’s needed and cut down on filament jams and inconsistent extrusion. Think about fan noise too; a powerful fan that sounds like a jet can make your workspace miserable. In short, pick an upgrade that balances cooling power, smart ducting, and reasonable noise so your prints stay reliable without driving you crazy.
Mounting and Fitment
Good cooling and neat airflow are only part of the story—how the new extruder actually mounts to your printer makes a big difference in daily performance. You’ll want a kit made for your printer model or one that lists needed modifications; nothing ruins a build faster than misaligned holes or a bracket that doesn’t fit. Check dimensions and weight: heavier extruders can sag or stress the frame, so plan for extra supports if needed. Look at screw hole placement and whether the kit works with your existing brackets or sensors to avoid hunting for adapters. Also pick a design that gives easy access for maintenance and accepts different filament types, so swaps and troubleshooting stay quick and painless.
Firmware and E-steps
When you swap to a direct-drive extruder, you’ll need to recalibrate your firmware’s E-steps so the printer pushes the correct amount of filament, and that step is more important than most people expect. Start by measuring extrusion and adjusting E-steps—many printers move from a default around 93 to roughly 424.9 with direct drives. If you skip this, you’ll get under- or over-extrusion and poor prints. After tuning, flash the firmware to save the new E-steps permanently; otherwise settings can revert. Check any kit’s firmware recommendations first, since some include tailored configs. Finally, remember to tweak your slicer’s retraction and print profiles for a direct-drive setup—those changes work with your E-steps to give clean, reliable prints.
Maintenance and Reliability
You’ve just finished setting E-steps and tweaking slicer settings, but keeping a direct-drive extruder running well goes beyond that one-time setup. You’ll appreciate that direct-drive designs usually need less maintenance than Bowden systems because the filament path is short and simple, so clogs and jams happen less often. Choose an all-metal extruder body for better durability and less wear over years of printing. After installation, recalibrate E-steps regularly to keep extrusion accurate; a quick check saves hours of troubleshooting later. Look for efficient heat dissipation—dual fans or well-vented heatsinks—so parts don’t overheat during long prints. Finally, dual-gear feeding gives consistent filament grip, reducing extrusion hiccups and improving overall reliability.
FAQ
Will These Kits Fit My Printer Without Firmware Changes?
1. Do I need to change my printer’s firmware to install a new kit?
Yes, most kits require firmware modifications to function properly with your printer.
2. What specific aspects should I check before installing a kit?
It’s important to verify mounting dimensions, motor wiring, and microstepping settings to ensure compatibility.
3. Are there any kits that don’t require firmware changes?
Some plug-and-play kits are designed to avoid firmware edits, but they are less common.
4. What types of firmware edits are typically needed?
Common edits include adjustments for retraction settings, PID tuning, and recalibrating steps-per-mm.
5. How can I ensure my motor wiring is correct?
Double-check the specifications provided with the kit and compare them to your printer’s existing wiring configuration.
6. What are microstepping settings and why do they matter?
Microstepping settings control the precision of motor movements; incorrect settings can lead to poor print quality.
7. What is PID calibration and why is it necessary?
PID calibration helps maintain temperature stability in your printer’s hotend or heated bed, crucial for consistent printing.
8. What happens if I don’t adjust the firmware?
Failing to adjust the firmware can result in malfunctioning components, inaccurate prints, or even damage to your printer.
9. How do I adjust retraction settings?
You’ll typically need to access your printer’s slicer settings or firmware configuration to modify retraction parameters for optimal performance.
10. Is there a way to test if a kit will fit my printer before installation?
Reviewing compatibility documentation and user reviews can provide insights into whether a kit is suitable for your specific printer model.
Can I Print Flexibles Without Retraction Tuning?
FAQ 1: Can I print flexible filaments without any tuning?
No, it is not advisable to print flexible filaments without some level of retraction tuning. Doing so will likely result in issues such as stringing and blobs.
FAQ 2: What problems can arise from not tuning retraction when printing flexibles?
Without proper retraction tuning, you may encounter stringing, blobs, and poor bridging in your prints. These issues can significantly affect the quality of the final product.
FAQ 3: What adjustments are necessary for printing flexibles effectively?
To print flexibles reliably, you need to adjust retraction length, speed, print temperature, and print speed. Each of these settings should be tailored to your specific filament and setup.
FAQ 4: Why is retraction important for flexible filament printing?
Retraction is crucial because it helps prevent excess filament from oozing out during non-print moves, which can lead to stringing and other printing defects.
FAQ 5: How does retraction length affect flexible filament printing?
Retraction length determines how much filament is pulled back during a non-print move. If this is not set correctly, it can result in either insufficient retraction, causing stringing, or excessive retraction, leading to under-extrusion.
FAQ 6: What role does retraction speed play in printing flexibles?
Retraction speed affects how quickly the filament is retracted and released. If set too fast, it may not allow enough time for the filament to retract properly, leading to stringing.
FAQ 7: How does print temperature impact the printing of flexible filaments?
Print temperature influences filament flow and adhesion. If the temperature is too high, it can cause excessive oozing, while too low can lead to poor layer adhesion.
FAQ 8: Why is print speed important when working with flexible filaments?
Print speed affects the overall extrusion consistency and the filament’s ability to flow smoothly. Slower speeds often yield better results with flexible filaments as they allow for more controlled extrusion.
FAQ 9: Can I use the same settings for all types of flexible filaments?
No, different types of flexible filaments can behave very differently. It’s essential to adjust your settings based on the specific filament you are using for optimal results.
FAQ 10: Is a direct-drive setup necessary for printing flexible filaments?
While a direct-drive setup is not strictly necessary, it is often recommended for printing flexible filaments. It provides better control over the filament feed, helping to reduce issues like jamming and inconsistent extrusion.
Do Any Kits Include a BLTOUCH or Mesh Bed Leveling?
1. Do upgrade kits come with a BLTouch?
Yes, some upgrade kits include a BLTouch for enhanced bed leveling capabilities.
2. Are there kits that provide mesh bed leveling probes?
Yes, certain upgrade kits offer add-on mesh bed leveling probes as part of the package.
3. Can I enable mesh leveling with my upgrade kit?
Some kits include firmware and configuration files that allow you to enable mesh leveling on your printer.
4. How do I check sensor compatibility?
You should verify the sensor compatibility by checking the specifications of your printer model and the upgrade kit.
5. Is wiring included with the upgrade kits?
Wiring is typically included in the upgrade kits, but it’s essential to confirm this based on the specific kit and your printer model.
6. What should I consider before purchasing a kit?
Ensure that the kit you choose is compatible with your printer model and includes the necessary components for installation.
7. Do I need additional tools for installation?
While many kits provide most components, you may need basic tools for installation, such as screwdrivers or pliers.
8. Will I need to update my printer’s firmware?
Updating your printer’s firmware may be necessary to utilize new features provided by the upgrade kit, such as mesh leveling.
9. Can I install the BLTouch myself?
Yes, with some basic technical knowledge, you can install the BLTouch yourself, following the provided instructions in the kit.
10. What if my printer model isn’t listed as compatible?
If your printer model isn’t listed, it’s best to contact the manufacturer or check online forums for advice on compatibility and installation.
How Do Direct-Drive Upgrades Affect Print Speed Limits?
1. How do direct-drive upgrades affect max print speeds?
Direct-drive upgrades typically lower the maximum print speed when using heavy filaments due to increased inertia. However, they allow for improved acceleration and more reliable retractions, especially with flexible materials.
2. What is the trade-off when upgrading to direct-drive?
The main trade-off is sacrificing top-end linear speed in exchange for enhanced control over prints. This allows for better tuning and firmware adjustments to optimize overall performance.
3. Can direct-drive systems handle flexible filaments better than Bowden setups?
Yes, direct-drive systems excel with flexible filaments due to their direct connection to the hot end, allowing for more accurate retractions and reduced chances of filament jams.
4. Will direct-drive upgrades affect my printer’s acceleration?
Yes, direct-drive setups generally enable higher acceleration rates compared to Bowden systems. This enhancement is particularly beneficial for printing flexible materials.
5. How can I reclaim performance after a direct-drive upgrade?
To reclaim performance, you can adjust firmware settings and fine-tune your printer’s parameters. This can help balance the reduced linear speed with improved control and acceleration.
6. Are there specific filaments that benefit more from direct-drive upgrades?
Flexible filaments notably benefit from direct-drive upgrades due to their sensitivity to retraction and feed accuracy. Heavier filaments may not see the same level of improvement.
7. What should I consider before upgrading to a direct-drive system?
Consider the types of filaments you most frequently use and whether you prioritize speed or control. If you often print flexible materials, a direct-drive upgrade may be advantageous.
8. Do direct-drive upgrades require significant firmware changes?
While not always mandatory, many direct-drive upgrades benefit from firmware adjustments to optimize settings for acceleration and retraction. This can enhance overall print quality and performance.
9. Is a direct-drive system suitable for all types of prints?
Direct-drive systems are particularly suitable for prints with flexible materials and complex geometries. However, for heavy filaments, you might experience limitations in maximum print speed.
10. Can I still print at high speeds after upgrading to direct-drive?
You can achieve high speeds, but it may not be as high as with a Bowden setup for heavy filaments. The goal is to find a balance between speed and control, optimizing for the specific materials you use.
Which Kits Support Dual Extrusion Setups?
1. What kits are compatible with dual extrusion?
Several kits support dual extrusion setups, including the Bondtech LGX-DUO, E3D Hemera Duo, BMG-based dual kits from Slice, and Titan Aero dual setups.
2. Do I need specific firmware for dual extrusion?
Yes, you will need matching firmware to ensure that both nozzles operate reliably during dual extrusion.
3. Are there specific hotends required for dual extrusion?
Dual extrusion setups require compatible hotends that can handle the unique demands of using two nozzles simultaneously.
4. What about wiring harnesses for dual extrusion?
A proper wiring harness is necessary to connect both nozzles, ensuring they receive the right signals and power for optimal performance.
5. Can I use any 3D printer with dual extrusion kits?
Not all 3D printers are compatible with dual extrusion kits. It’s essential to check compatibility with your specific printer model.
6. Is there a difference in print quality with dual extrusion?
Dual extrusion can enhance print quality, especially for complex models that require multiple materials or colors, but it depends on the setup and calibration.
7. What materials can I use with dual extrusion?
You can use a variety of materials, including different filaments for color changes or support materials, depending on your printer’s capabilities.
8. How difficult is it to set up a dual extrusion kit?
Setting up a dual extrusion kit can be complex and may require technical knowledge to install firmware, hotends, and wiring correctly.
9. Do dual extrusion kits come with instructions?
Most dual extrusion kits come with installation instructions, but additional resources or community support may be necessary for troubleshooting.
10. Can I upgrade my existing printer to support dual extrusion?
In many cases, you can upgrade an existing printer to support dual extrusion by adding a compatible kit, provided the printer hardware allows for it.
Final Thoughts
Upgrading to a direct-drive extruder is a game changer for your 3D printing experience. It will not only enhance the quality of your prints but also give you the confidence to tackle flexible and specialty filaments like a pro. Expect to see fewer jams, smoother retraction, and improved overhangs in your prints. Installation on popular Ender and CR models is typically straightforward, so you can get right to it without unnecessary hassle. Choose a kit that aligns with your hotend temperature requirements while keeping the weight manageable for optimal speed. With the right upgrade, you’ll minimize troubleshooting and maximize your time creating impressive parts that you’re proud to showcase. Trust me, this is the upgrade you need to take your 3D printing to the next level.