Upgrading your Ender 3’s hotend can fix clogging, print artifacts, and limits on filament choice, so it’s worth a close look. I’ll walk you through five practical hotend kits—from drop-in all-metal swaps to high-flow and high-temp options—what each solves, and which suits different projects and budgets. You’ll spot easy installs and trade-offs fast, and know which upgrade actually improves your prints. Ready to pick the right one?
Microswiss All Metal Hotend Kit for Creality CR-10 / Ender 2/3/5 Printers (.4mm)
If you want a simple, reliable way to squeeze better performance out of an Ender 3 without overhauling your whole printer, the Microswiss All Metal Hotend is a smart pick — think of it as an upgrade that focuses on durability and consistent extrusion. You’ll drop in a USA-made kit with a titanium heat break, aluminum blocks, a brass-plated 0.4mm nozzle, and a silicone sock. Installation’s straightforward if you follow a tutorial, and heating’s fast. Prints get smoother, with less heat creep and better filament control, though high-temp limits and PID tweaks still need caution.
Best For: users of Creality CR-10/Ender 2/3/5 printers who want a straightforward, durable drop-in hotend upgrade for more consistent extrusion and better filament control without replacing the whole printer.
Pros:
- Made in USA with durable components (titanium heat break, aluminum blocks, brass-plated 0.4mm nozzle) for reliable, long-lasting performance.
- Straightforward drop-in installation and fast heat-up (≈200°C in ~20–25s) that improves extrusion consistency and reduces heat creep.
- Handles a wide range of filaments (PLA, PETG, flexible filaments, Nylon in many cases) and performs well at higher print speeds.
Cons:
- Aluminum heater block and Ender firmware temperature limits (~260°C) restrict true high-temperature printing; only modest (~5°C) increase in max operating temp versus stock.
- Slightly higher price than some alternatives; not a guaranteed solution for printing the highest-temp materials without further upgrades (e.g., copper block).
- Beginners may encounter installation or tuning challenges (heater/thermistor fitting, PID caution) despite plentiful tutorials.
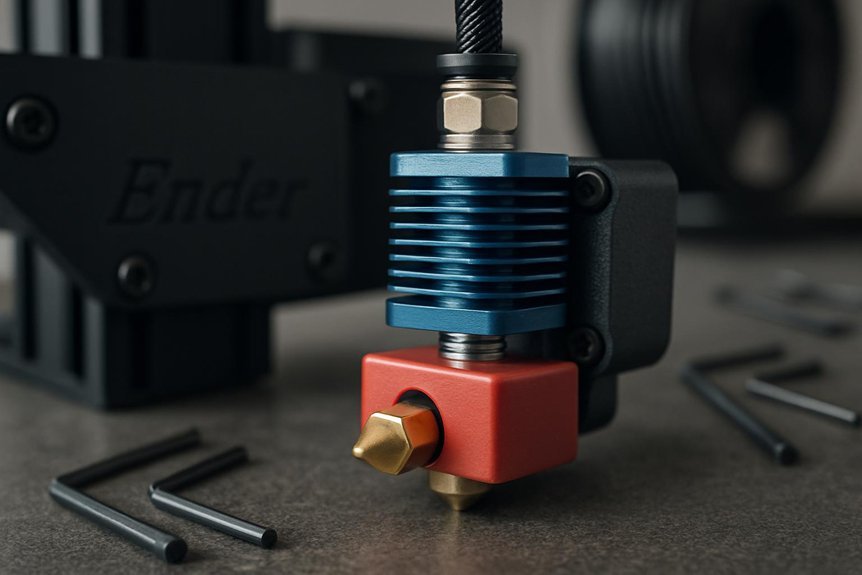
Microswiss FlowTech Hotend for Creality Ender 3 V3 KE (Leakproof All-Metal High-Flow Nozzle)
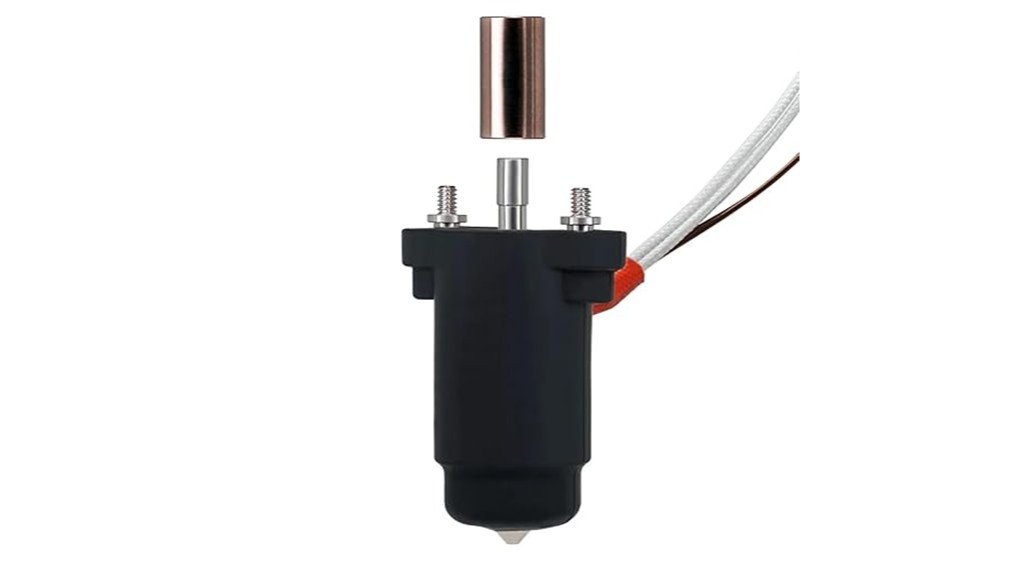
You’ll appreciate the Microswiss FlowTech hotend if you’re after a clean, reliable upgrade that makes high-flow printing simpler and less messy. You’ll notice its leak-proof design combines nozzle and thermal break into one sealed assembly, which stops filament leaks that ruin prints and waste material. The all-metal construction, made in the USA, handles most filaments and lets you print up to 300°C. Swapping nozzles is fast and safe — cold changes with one hand, no hot tightening. A ceramic cylindrical heater and long melt zone boost volumetric flow, and each unit is fully tested for quality before shipping.
Best For: Makers and Ender 3 V3 KE owners seeking a reliable, high-flow, leak-proof all-metal hotend upgrade for cleaner, higher-temperature printing.
Pros:
- Leak-proof sealed nozzle/thermal-break assembly prevents messy filament leaks and material waste.
- Cold, one-handed nozzle changes make swaps quick and safe without hot tightening.
- All-metal design with a ceramic heater and long melt zone supports high volumetric flow and printing up to 300°C.
Cons:
- Rated max temperature of 300°C may limit use with some high-temperature specialty filaments.
- Upgrade requires installation and may need minor printer adjustments or calibration for optimal performance.
- Higher upfront cost compared with stock hotends or basic replacement nozzles.
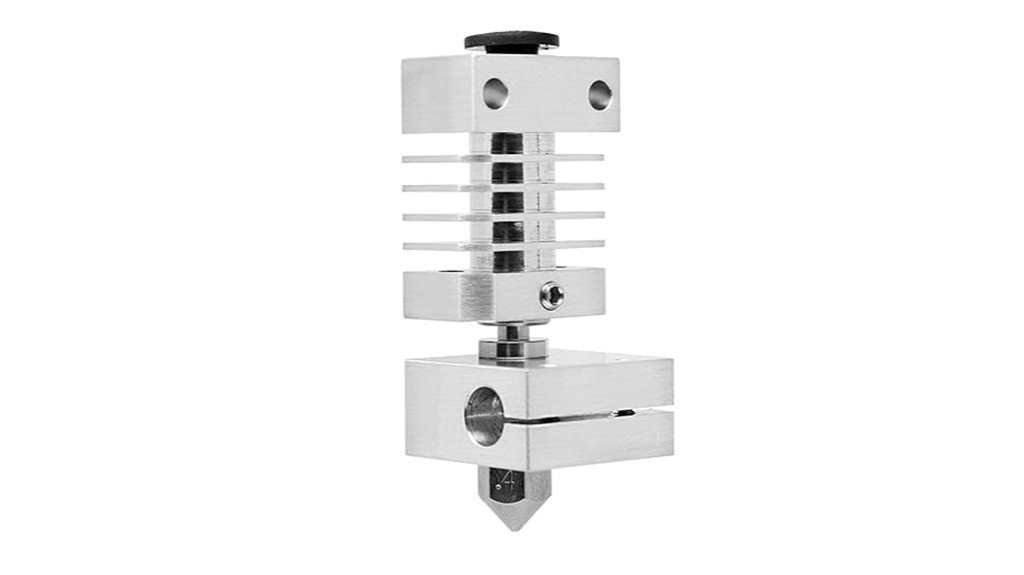
Ender 3 Hotend Upgrade Kit for 3D Printers (All-Metal Ceramic Hotend with Copper Heater Block and Bimetal Heatbreak)
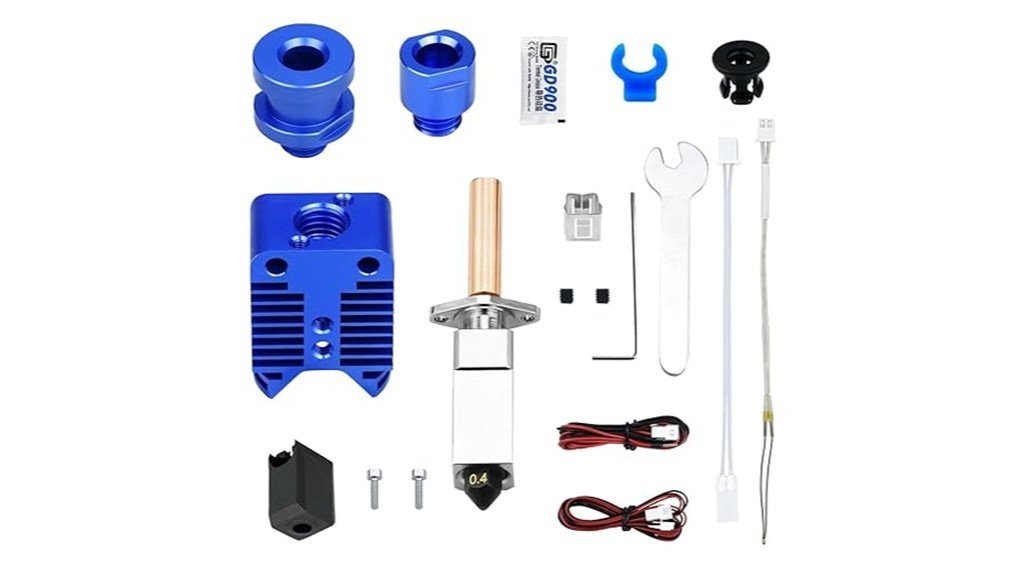
For makers who want faster, higher-temperature printing without dealing with flaky PTFE-lined hotends, the Ender 3 All‑Metal Ceramic Hotend Upgrade is a solid step up. You’ll get an all-metal assembly with a copper heater block, ceramic 24V 48W heater, and a bimetal heatbreak (TC4 titanium with copper plating) that improves dissipation. It supports common Creality and Voron machines and uses an NTC 100K thermistor with Marlin config options. Hardened steel nozzles are removable and resist wear, while the heater block reaches high temps (useful filaments up to 300°C). It’s sturdy, reliable, and built for faster, hotter printing.
Best For: Makers upgrading Ender/Voron-style printers who want an all‑metal hotend for higher-temperature and faster printing without PTFE lining issues.
Pros:
- All‑metal bimetal heatbreak and copper heater block enable better heat dissipation and higher-temp printing (up to 300°C recommended).
- Ceramic 24V 48W heater and NTC 100K thermistor support reliable, fast heating suitable for specialty filaments.
- Hardened steel removable nozzles reduce wear and are easy to replace, lowering maintenance time.
Cons:
- Rated for 300°C max printing despite heater block capable of higher temps; not suitable for extreme high‑temperature materials requiring >300°C.
- Installation may require firmware/config updates (Marlin thermistor settings) and moderate mechanical skill.
- Heatsink secured by small M2 screws and all‑metal path can be less forgiving with filament jams compared to PTFE‑lined setups.
Creality Ender 3 Hotend Kit with 5x 0.4mm Nozzles for Ender 3/V2/Pro
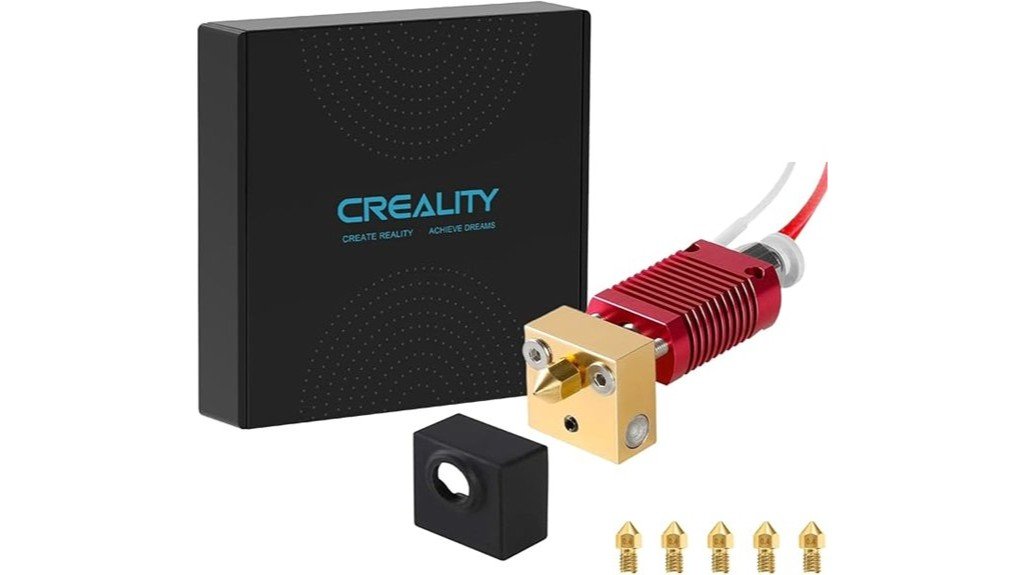
This Creality Ender 3 Hotend Kit is a smart pick for hobbyists and casual makers who want a reliable, plug-and-play upgrade that improves print quality without a big learning curve. You get an authentic, assembled hotend compatible with Ender 3, V2, and Pro, plus five 0.4mm brass nozzles so you can swap quickly. Installation is simple—pluggable heating tube, thermistor, and a silicone cover for steadier temps. Users report fewer clogs and better extrusion, though some swap the Bowden tube to avoid jams. It’s affordable, backed by a warranty, and often fixes common printing headaches fast.
Best For: hobbyists and casual makers using Ender 3/Ender 3 V2/Ender 3 Pro who want a simple, plug-and-play hotend upgrade that improves print quality and reliability.
Pros:
- Plug-and-play assembled hotend with silicone cover for improved temperature stability and easier installation.
- Includes five 0.4mm brass nozzles and supports multiple MK8 nozzle sizes for quick swapping and versatility.
- Many users report fewer clogs, better extrusion, and quick resolution of common printing issues.
Cons:
- Included Bowden tube may have an inner diameter that can cause filament jams for some users.
- Some users needed to replace parts or tweak fittings to eliminate occasional installation fit issues.
- Brass nozzles wear faster with abrasive filaments; consider hardened nozzles for long-term use.
Ender 3 Hotend Upgrade Kit (M3 Stud Thermistor) compatible with Creality Ender 3 V2/Pro and CR-10
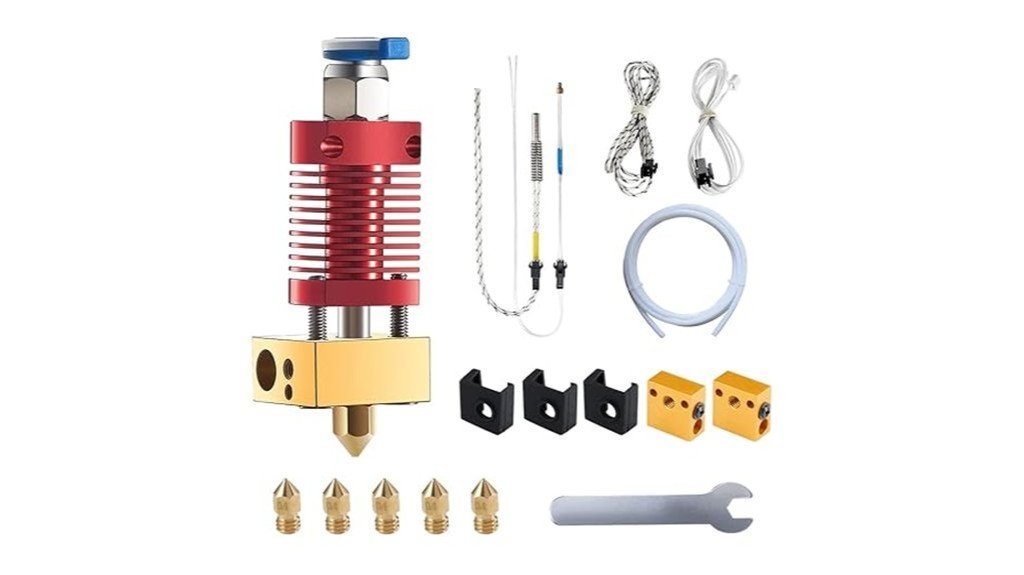
If you want an affordable, easy-to-install hotend that boosts reliability and lets you print more filaments, the Ender 3 Hotend Upgrade Kit with the M3 stud thermistor is a smart pick—especially if you’re running an Ender 3 V2/Pro, CR-10, or similar Creality machines. You get a pre-assembled J-head, M3 stud NTC 100K thermistor, 24V 40W heater, five 0.4mm nozzles, spare blocks, silicone covers, and a wrench. Installation is quick with plug connectors, but check bed level and Z-offset afterward. Reviews praise print quality and value, though watch for connection or heat-creep issues.
Best For: Hobbyists and beginner-to-intermediate Creality users (Ender 3 V2/Pro, CR-10 and similar) who want an affordable, easy-to-install hotend upgrade to improve print reliability and material compatibility.
Pros:
- Pre-assembled J-head kit with M3 stud NTC 100K thermistor and plug connectors for quick, straightforward installation.
- Includes useful extras (24V 40W heater, five 0.4mm nozzles, spare heated blocks, silicone covers, wrench) for good out-of-the-box value.
- Often improves print quality and allows printing a wider variety of filaments compared with stock hotend.
Cons:
- Some users report issues like heat creep, filament leaking, or connection problems that can require troubleshooting.
- A few customers expected a full-metal hotend and returned the product when it did not meet that expectation.
- May require Z-offset and bed re-leveling after installation; some prefer OEM Creality parts for maximum reliability.
Factors to Consider When Choosing Essential Hotend Upgrades for Ender 3
When you’re picking hotend upgrades for your Ender 3, think about the temperature range you need and which materials you want to print, because that decides the heater block, thermistor, and nozzle choices. You’ll also want to weigh heatbreak material and heater block performance for reliability and fewer clogs, and pick nozzle sizes that match the detail and speed you want. These choices affect compatibility and print quality, so balancing your goals and budget will save you time and frustration.
Temperature Range Needs
Because the hotend sets the temperature limits of your prints, you’ll want to think carefully about the maximum and stable temperatures a new unit can reach before you commit to an upgrade. Check the maximum rating—many hotends hit about 300°C, which covers PLA, PETG, TPU and some higher-temp blends. More important is stability: a hotend that holds temperature steady prevents heat creep and jamming, so look for solid thermal design and good PID performance. Note heater wattage too; higher watts heat faster and keep temps steady under load. Also consider heater block material—aluminum can limit peak performance compared with copper, which conducts heat better. Match these specs to your printing goals so you don’t outgrow the upgrade.
Material Compatibility Limits
Even though many upgrades advertise high temperature ranges, the parts themselves—especially aluminum heater blocks—often set the real limits you’ll face, so it’s important to match the hotend’s construction to the filaments you want to run. Aluminum blocks usually cap safe printing around 260°C, which rules out Nylon and some specialty filaments, even if the spec sheet claims higher temps. Some kits say “up to 300°C,” but aluminum parts commonly keep effective use at or below that. Swapping to a copper block can raise the usable temperature window, and purpose-built all-metal hotends are better for advanced thermoplastics. Always check manufacturer notes for filament compatibility and whether the upgrade supports flexibles or needs precise thermal control, so you don’t end up frustrated.
Heatbreak Material Choice
Choosing the right heatbreak is one of the smartest upgrades you can make for an Ender 3, since it directly affects how well your hotend controls heat and moves filament through the melt zone. You’ll want a material that minimizes heat transfer to the cold end so filament won’t soften prematurely and jam. Titanium and copper are popular: titanium reduces heat creep, copper offers superb thermal conductivity and dissipation. Bimetal designs combine strengths—usually a copper section near the heater and a titanium throat—to keep the melt zone tight and stable. Material choice also affects max temperatures; copper setups can tolerate much higher temps than basic aluminum. Pick a high-quality heatbreak and you’ll see smoother extrusion, fewer clogs, and better prints across filaments.
Heater Block Performance
When you swap out or upgrade your Ender 3’s heater block, you’ll notice how much it changes heating speed, temperature stability, and how reliably filament flows through the nozzle. Choose a material wisely: copper blocks heat faster and transfer heat better than aluminum, so prints warm up quicker and hold temperature more evenly. Look for designs that limit heat creep so the filament won’t soften too early and clog the throat. If you want to try high-temp filaments later, pick a block rated to 500°C. Ceramic-heated blocks can respond and stabilize faster, too. Finally, use good insulation—silicone socks or thermal barriers—to cut heat loss and keep temps steady; it’s a small tweak that makes a big difference.
Nozzle Size Options
If you want crisper details or much faster prints, the nozzle size you pick makes a huge difference, so it’s worth thinking through how you use your Ender 3. Nozzles typically run from 0.2mm to 1.0mm; 0.4mm is the everyday choice because it balances detail and speed. Go with a 0.2mm when you want fine features—you’ll see sharper lines, but you’ll need to slow down and watch for clogs. Choose 0.8mm or 1.0mm for big, speedy parts; they push more plastic and cut print time, though small details will blur. Remember flow rate: larger nozzles need higher volumetric flow. Finally, check that your hotend supports the size you pick, since some designs work best with specific nozzle diameters.
Ease Of Installation
Because a smooth install saves you time and frustration, ease of installation is a key factor to weigh when picking a hotend upgrade for your Ender 3. Many kits come with pre-assembled parts, so you won’t be wrestling with tiny screws or confused wiring right away. Fast-replace plug connectors for heater and thermistor wires make swapping components quick, which is great if you like experimenting. Clear instructions and plentiful online tutorials mean you can follow step-by-step guidance even if you’re new to mods. Most users only need basic household tools, not specialty gear, though you should plan to re-check bed level and Z-offset afterward. Those adjustments are usually simple, and getting them right makes the upgrade feel truly worth it.
Firmware And Safety
After you’ve got the hotend physically installed and the bed re-leveled, you’ll want to check the firmware and safety settings before printing anything. You should confirm the firmware supports the new hotend parts, since some upgrades need config changes to work right. Verify the thermistor type and resistance so temperature readings stay accurate; I once chased bad prints until I noticed a mismatched thermistor. Check whether PID tuning needs adjustment — wrong PID causes temperature swings and poor prints — and run a PID autotune if needed. Also make sure thermal runaway protection is enabled so the printer shuts down if temperatures get out of control. Finally, keep an eye on firmware updates, because they often add safety fixes and performance tweaks.
FAQ
Do These Hotends Require Firmware Changes or PID Tuning?
1. Do drop-in hotends require firmware changes?
Typically, drop-in hotends do not require any firmware changes upon installation.
2. Is PID tuning necessary after installing a new hotend?
Yes, you may need to perform PID tuning after installing a new hotend to ensure optimal temperature control.
3. What if the heater cartridge type changes?
If the heater cartridge type differs from the previous one, you may need to update your firmware or sensor settings to accommodate the new specifications.
4. Do I need to adjust settings for a different thermistor?
Yes, if you’re using a different thermistor type, you’ll need to update the firmware or the sensor settings accordingly.
5. How can I perform PID tuning?
PID tuning can usually be performed through your printer’s control interface, often with specific commands or a tuning function.
6. What happens if I skip PID tuning?
Skipping PID tuning can result in poor temperature stability, leading to inconsistent print quality and potential issues like under-extrusion or overheating.
7. Can I use the same firmware for a different hotend?
You can use the same firmware, but if there are changes in components like the thermistor or heater cartridge, adjustments may be necessary.
8. How do I know if my hotend is compatible with my firmware?
Check the specifications of your hotend against the firmware documentation to ensure compatibility with components like thermistors and heater cartridges.
9. What is the role of the thermistor in the hotend?
The thermistor measures the temperature of the hotend, and using the correct type is crucial for accurate temperature readings and control.
10. Will all hotend upgrades require the same adjustments?
Not all hotend upgrades will require the same adjustments, as it depends on the specific components used and whether they differ from the original setup.
Can I Print Flexible Filaments Reliably With These Upgrades?
1. Can I print flexible filaments with my current setup?
It depends on your printer’s configuration. A direct-drive extruder or an improved filament path is essential for reliable printing.
2. What upgrades do I need for better flexible filament printing?
Upgrades like a direct-drive extruder and a smoother filament path can significantly enhance your ability to print flexible materials.
3. How important are print settings for flexible filaments?
Proper print settings are crucial. Slower speeds and higher retraction control help prevent issues while printing flexible materials.
4. What speed should I set for printing flexible filaments?
Printing at slower speeds is recommended to achieve better layer adhesion and reduce the risk of jams or misprints.
5. How can I control retraction effectively?
Higher retraction settings can help prevent stringing and ensure clean prints. Experimenting with retraction distance and speed will yield the best results.
6. What role does extruder tension play in printing flexible filaments?
Tightening the extruder tension is vital to prevent the filament from slipping or grinding, which can lead to failed prints.
7. Is a direct-drive extruder necessary for flexible filaments?
While not absolutely necessary, a direct-drive extruder greatly improves the printing of flexible filaments by reducing the distance the filament travels before being extruded.
8. What is an improved filament path?
An improved filament path minimizes bends and friction points, allowing flexible filaments to feed more smoothly into the extruder.
9. Can I use Bowden-style extruders for flexible filaments?
Bowden-style extruders can work, but they often require more careful tuning and may lead to issues with flexible filaments due to the longer filament path.
10. What should I do if my flexible filament keeps jamming?
Check your extruder tension, ensure the filament path is clear, and adjust print speeds or retraction settings as needed to alleviate jamming issues.
How Do These Hotends Affect Printing Speed and Retraction Settings?
1. How do hotends improve printing speed?
Hotends with better thermal control allow for higher printing speeds. They maintain consistent temperatures, which helps in achieving quicker layer adhesion.
2. What is the impact of hotends on retraction settings?
Improved hotends can reduce stringing and oozing, allowing for more aggressive retraction settings. This means you can retract filament more efficiently during non-print moves.
3. Should I adjust retraction distance with a new hotend?
Yes, it’s advisable to dial in your retraction distance when using a new hotend. Each filament may react differently, so testing is essential.
4. How does retraction speed affect print quality?
Increasing retraction speed can minimize the time the filament spends in the nozzle, reducing stringing. However, if set too high, it might lead to clogs or inconsistent extrusion.
5. Are there specific tests I should run for retraction settings?
Conduct small test prints to find the optimal retraction distance and speed for your specific filament. This helps ensure quality prints without defects.
6. Can all filaments benefit from improved hotends?
Most filaments will see improvements in print quality and speed with advanced hotends. However, some specialty filaments may require unique settings.
7. What is stringing, and how does it relate to hotends?
Stringing occurs when excess filament oozes out of the nozzle during non-print moves. Hotends with superior thermal management can significantly reduce this issue.
8. Is faster printing always better?
Faster printing can enhance efficiency, but quality must not be compromised. It’s essential to find a balance between speed and print quality.
9. What should I consider when adjusting my hotend settings?
Consider the filament type, desired print quality, and the specific capabilities of your hotend. Each factor plays a role in determining the optimal settings.
10. How can I minimize oozing during prints?
To reduce oozing, adjust your retraction settings and ensure your hotend maintains a consistent temperature. Performing tests will help you find the right balance.
Are Any Special Tools Needed for Installation or Maintenance?
FAQs on Tools Needed for Installation and Maintenance
1. What tools are needed for installation?
You will primarily need hex keys and a small adjustable wrench for the installation process.
2. Is a torque screwdriver necessary?
Yes, a torque screwdriver is recommended for precise tightening during installation and ongoing maintenance.
3. Do I need pliers for the installation?
Pliers can be helpful for gripping and maneuvering components, making them a useful addition to your toolset.
4. What about thermal paste or grease?
Thermal paste or high-temp PTFE-safe grease is essential for ensuring proper heat transfer and lubrication during installation.
5. Are any specialized tools required?
No specialized tools are required; standard tools will suffice for most installation and maintenance tasks.
6. Can I use regular grease instead of high-temp grease?
It’s best to use high-temp PTFE-safe grease to ensure compatibility and longevity under high-temperature conditions.
7. How often should I check the torque settings?
It’s advisable to check torque settings periodically, especially after initial installation, to ensure everything remains secure.
8. Do I need any additional tools for maintenance?
The same tools used for installation will typically be adequate for routine maintenance tasks.
9. Is a specialized wrench necessary?
A small adjustable wrench is adequate; no specialized wrench is necessary for most installations.
10. What if I don’t have a torque screwdriver?
If you don’t have a torque screwdriver, you can use a regular screwdriver, but be cautious to avoid over-tightening.
Do These Upgrades Impact Bed Leveling or Auto-Bed Sensor Compatibility?
1. Do hotend upgrades affect bed leveling?
Yes, certain hotend upgrades can influence bed leveling due to changes in height and positioning.
2. What should I check after upgrading my hotend?
After an upgrade, verify the probe offset and ensure there’s adequate mounting clearance for the new hotend.
3. Will I need to adjust my Z-offset?
It’s likely that you will need to adjust the Z-offset to maintain proper nozzle height from the bed after a hotend upgrade.
4. How can I ensure my auto-bed leveling sensor works post-upgrade?
Reconfigure the auto-bed leveling sensor settings in your firmware to ensure compatibility with the new hotend setup.
5. What is probe offset?
Probe offset is the distance from the nozzle to the probe used for auto-bed leveling, which may change with different hotends.
6. Is mounting clearance important for hotend upgrades?
Yes, adequate mounting clearance is crucial to prevent interference between the hotend and the auto-bed leveling sensor.
7. Can I use my existing auto-bed leveling sensor with a new hotend?
In most cases, you can use your existing sensor, but you may need to adjust its configuration for optimal performance.
8. What firmware settings should I check after an upgrade?
You should check the settings related to probe offsets, Z-offset, and any specific parameters for your hotend model in the firmware.
9. Are all hotend upgrades compatible with auto-bed leveling?
Not all upgrades are inherently compatible; it depends on the specific hotend and sensor used, so always verify compatibility.
10. What happens if I don’t adjust settings after an upgrade?
Failing to adjust the necessary settings can lead to inaccurate leveling, potentially resulting in poor print quality or nozzle collisions.
Final Thoughts
Upgrading the hotend on your Ender 3 is a game changer for print quality and reliability. Trust me, I’ve been through the trials and errors, and the difference is night and day. If you want dependable all-metal performance, go with the Microswiss hotend. For those who prioritize higher flow rates and easy maintenance, the FlowTech is your best bet. If you’re tackling demanding filaments, the high-temp All-Metal Ceramic kit is essential. Creality’s own hotend kit is perfect for straightforward installs and comes with spare nozzles, making it a solid choice for anyone. Don’t forget the M3-stud thermistor upgrade; it significantly enhances compatibility. Choose your hotend upgrade based on your filament type, temperature needs, and your level of expertise, and you’ll be rewarded with smoother, more consistent prints every time.