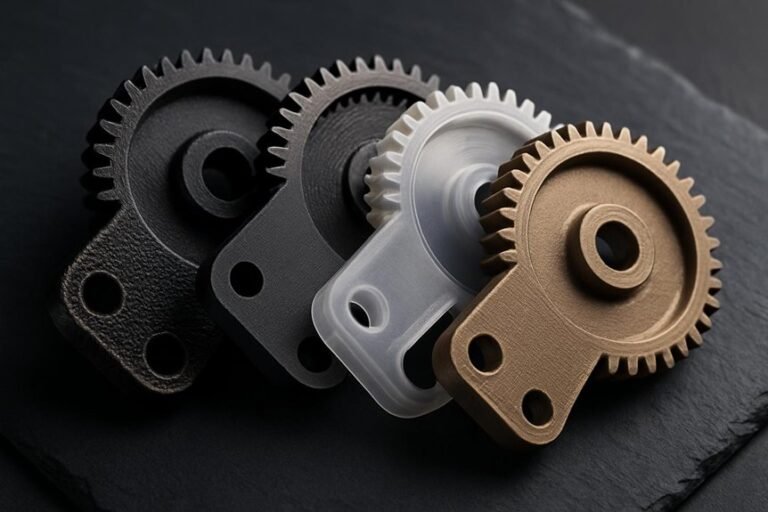
If you want smoother prints and fewer bed-adhesion headaches, the right PEI plate can make a big difference. You’ll get reliable first-layer stick, easier part removal, and less warping across different materials. I’ll walk you through four top-rated options—each with its own strengths for fit, finish, and temperature tolerance—so you can pick the one that matches your printer and workflow. Stick around to find which one suits your setup best.
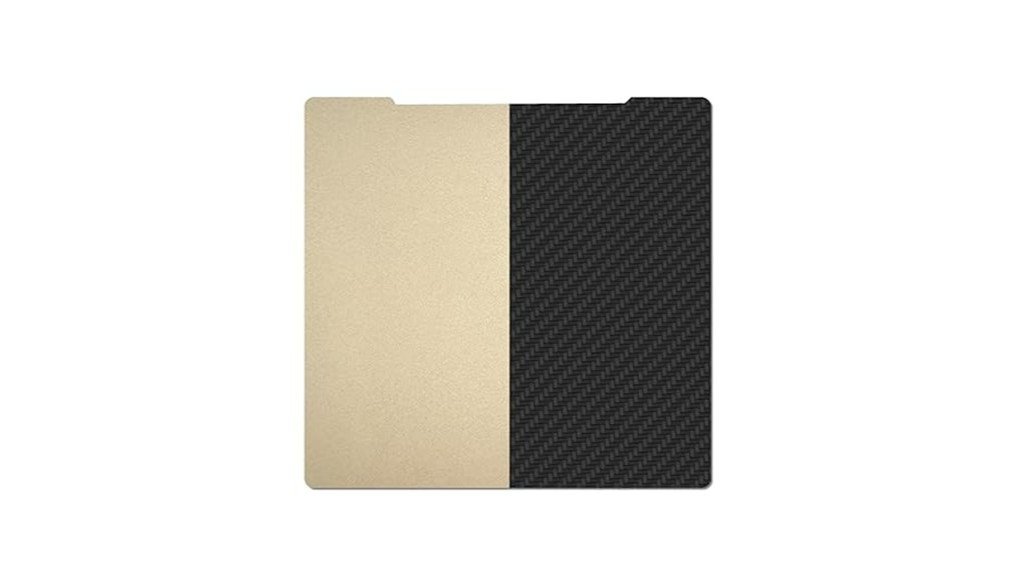
UniTak3D PEI Double-Sided Spring Steel Build Plate for Bambu Lab 3D Printers (257x257mm)
If you run a Bambu Lab printer and want a no-fuss surface that sticks when it should and releases when it’s cooled, the UniTak3D PEI double-sided spring steel plate is a solid pick—think of it as a tougher, more reliable upgrade to the stock bed. You’ll like the 257x257mm fit for P2S/P1S/P1P/X1 series and A1 printers. One side’s textured black PEI grips well up to 300°C, the smooth side handles 200°C and pops prints off easily. Folks rave about better adhesion and print quality, though PETG can bond too tightly and logos can affect leveling. Clean gently and consider a glue stick for some filaments.
Best For: users of Bambu Lab P2S/P1S/P1P/X1C/X1/X1E/A1 printers who want a durable, high-adhesion, easy-release upgrade to the stock 257x257mm build plate.
Pros:
- Superior adhesion on textured black PEI (up to 300°C) for a wide range of filaments, improving first-layer reliability.
- Double-sided spring steel design (textured + smooth) gives strong grip when needed and easy print removal when cooled.
- Compatible size for many Bambu Lab models; reported to improve print quality over stock plates.
Cons:
- PETG (and some materials) can bond excessively well, making part removal difficult without aids.
- Adhesion may fade for some users over time or be affected by logo placement/plate orientation.
- Requires gentle cleaning and occasional use of glue stick on the smooth side for certain filaments.
235x235mm Double Sided Textured PEI Flexible Magnetic Spring Steel Build Plate for Flashforge Adventurer 5M/5M Pro/AD5X
For Adventurer 5M, 5M Pro, and AD5X owners who want a no-fuss upgrade, this 235x235mm double-sided textured PEI spring steel plate is a smart pick that delivers dependable adhesion and easy part removal. You’ll get a magnetic, flexible stainless steel plate with frosted and smooth PEI sides so you can choose texture and temperature resistance—textured to 300°C, smooth to 200°C—while matching the Adventurer Pro’s 110°C bed. It installs tool-free, sticks firmly, and lets prints pop off when cooled to 40°C. Clean with isopropyl, skip acetone, and expect great results for many filaments.
Best For: Hobbyists and professionals using Flashforge Adventurer 5M/5M Pro or AD5X who want a reliable, easy-to-install build surface that offers strong adhesion and simple print removal.
Pros:
- Double-sided textured PEI (frosted and smooth) supports a wide range of filaments and offers high-temperature resistance (textured to 300°C, smooth to 200°C).
- Flexible magnetic spring steel plate provides tool-free installation, secure attachment, and easy part release by bending after cooling to ~40°C.
- Durable stainless steel core maintains flatness for thousands of prints and requires simple maintenance (clean with isopropyl alcohol).
Cons:
- Some users report packaging damage and occasional quality inconsistencies between units.
- May lack ArUco barcode compatibility for certain printer features on specific Adventurer models.
- Smooth side has lower temperature tolerance (200°C) which can limit some high-temp printing needs compared with textured side.
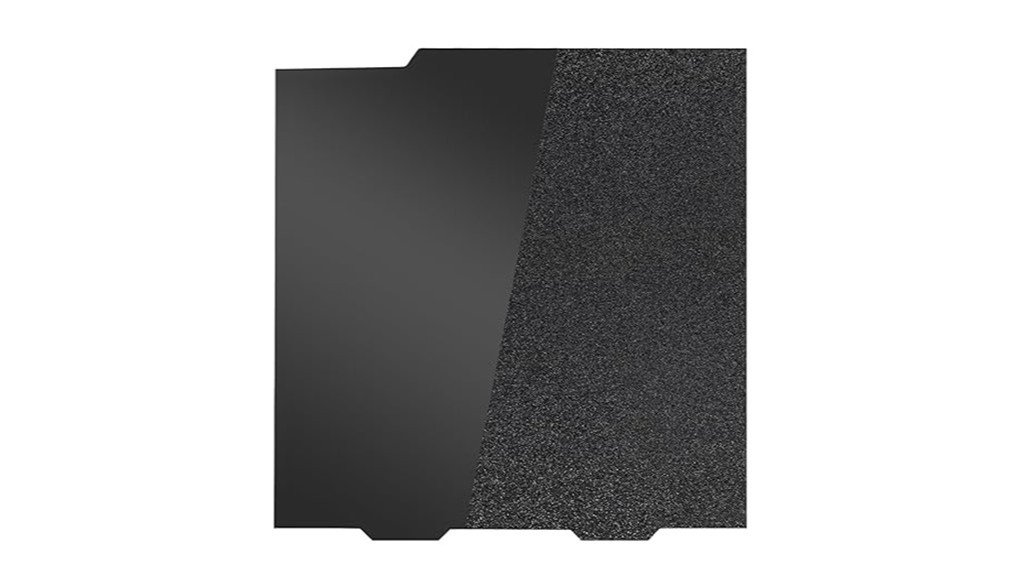
Prusa Dual-Sided Textured PEI + Smooth PET Build Plate (254x241mm)
You’ll appreciate the Prusa dual-sided plate if you want one build surface that gives you both a textured PEI side for strong adhesion with tougher filaments and a smooth carbon-fiber–style PET side for a sleek finish on everyday prints. You get a 254x241mm spring steel plate that fits Prusa MK2–MK4S printers, so it’s flexible yet won’t deform when you pop off parts. Use the textured PEI for ABS and other hot materials, and the 0.2mm PET for stylish finishes, but clean it with alcohol and expect to use Magigoo or glue sticks on first PET prints for reliable adhesion.
Best For: Makers and hobbyists who want one versatile Prusa-compatible build plate that offers a textured PEI side for strong adhesion with high-temp filaments and a smooth carbon-fiber–style PET side for sleek, low-temp prints.
Pros:
- Textured PEI side provides excellent high-temperature adhesion for ABS and other demanding materials.
- Smooth 0.2mm carbon-fiber–style PET side gives a clean, fashionable finish for everyday prints.
- Spring steel construction is flexible for easy print removal while resisting deformation.
Cons:
- PET (carbon fiber) side may require glue stick or Magigoo and careful setup for reliable first-layer adhesion.
- Different properties on each side can lead to accidental misuse if not clearly labeled or remembered.
- Not as forgiving as full smooth PEI for some materials and may perform less well with high-temp filaments on the PET side.
Textured PEI Build Plate for Bambu Lab A1 Mini (Flexible Double-Sided Spring Steel Sheet 184x184mm)
The textured PEI build plate for the Bambu Lab A1 Mini is a great pick if you want reliable adhesion and cleaner-looking prints without constant fiddling. You’ll like the 184x184mm double-sided spring steel sheet: textured black PEI grips well, while the smooth side helps with PETG and glossy finishes. It’s thicker to reduce warping and supports high-temp filaments like ABS and Nylon (textured side to 300°C, smooth to 200°C). Clean with soap and water or alcohol for best results, and expect a learning curve with PLA and TPU. Many users praise its value, though watch for scratches.
Best For: Enthusiasts and hobbyists using the Bambu Lab A1 Mini who want a versatile, durable build surface that improves adhesion and print finish across many filaments.
Pros:
- Textured black PEI offers strong adhesion and a clean matte finish; smooth side good for PETG and glossy prints.
- Thicker spring steel sheet reduces warping, improves Z-axis precision, and supports high-temp filaments (textured to 300°C).
- Double-sided, flexible design makes part removal easy and provides good value and compatibility with common filaments (PLA, PETG, ABS, TPU, Nylon).
Cons:
- Some users experience initial PLA adhesion issues requiring cleaning and bed-temperature/print-speed tuning.
- Smooth side can be sensitive—PETG/ASA can damage it if not handled properly.
- Susceptible to scratches (especially from TPU), so requires careful handling and regular cleaning to maintain performance.
Factors to Consider When Choosing Highly Rated PEI Build Plates
When picking a PEI build plate, you’ll want to check that the material is compatible with the filaments you use, consider whether you prefer a smooth or textured surface, and note the maximum temperature it can handle so prints stick without warping. Also think about how flexible the plate is for popping parts off and whether it uses a magnetic mounting system for easy removal and reattachment. These points will help you balance print quality, convenience, and durability without getting lost in technical jargon.
Material Compatibility Range
Although it might seem simple to pick a PEI build plate, you’ll want to think about the kinds of filaments you plan to print with most often, since different materials need different temperatures and surface textures to stick well. Highly rated PEI plates commonly handle PLA, ABS, PETG, TPU, Nylon, and PC, so you’ll get lots of flexibility for projects. Many plates are dual-sided: textured for higher-temp jobs (often up to 300°C) and smooth for lower-temp work (around 200°C), letting you switch based on material. Check compatibility with your printer model, since a poor fit hurts adhesion. Note PETG can bond too strongly sometimes; you’ll likely tweak bed temperature or speed to avoid stuck prints and get reliable results.
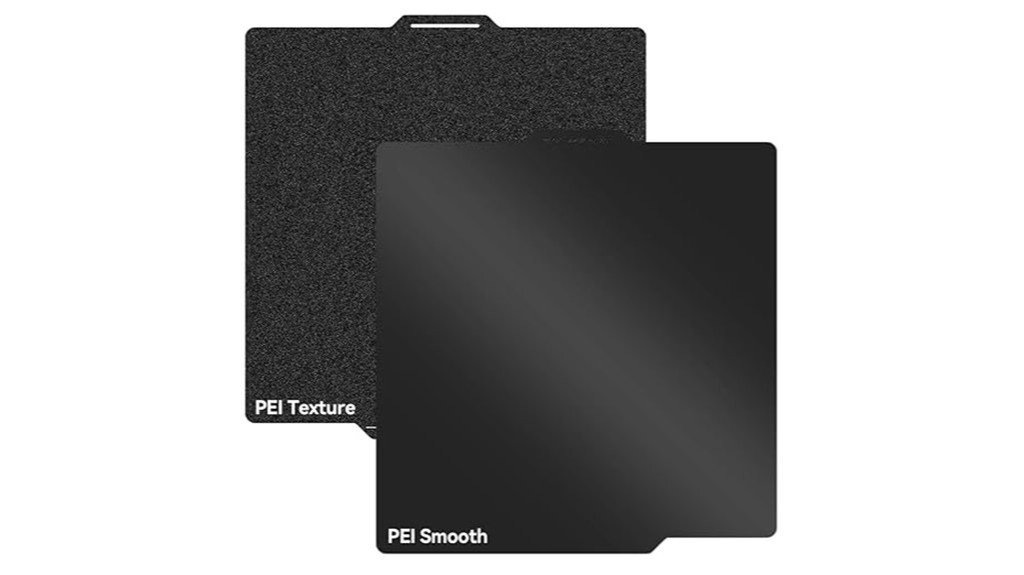
Surface Texture Options
One key choice you’ll make with PEI build plates is whether to go smooth or textured, since that decision affects how your prints stick, how they look, and how you remove them. Textured PEI usually gives stronger adhesion across many filaments, so you’ll see fewer warped corners and better first layers, which helps with tricky materials like ABS and Nylon. Smooth PEI is kinder for popping parts off and often leaves prints glossier, though you might need a glue stick or hairspray for certain filaments. Textured finishes tend to produce a matte look and can wear faster, so handle them carefully and clean gently. Think about the filaments you use, the finish you want, and how much maintenance you’ll tolerate before choosing.
Temperature Resistance Limits
If you liked the idea of textured versus smooth finishes for grip and appearance, you’ll also want to look at how hot the PEI can safely get—temperature limits affect what filaments you can print and how long the sheet will last. Textured sides often tolerate up to 300°C, while smooth sides usually handle around 200°C, so choose based on the hottest filament you plan to use. That higher resistance makes PEI great for ABS, Nylon, and PC, but running a sheet at its max temp all the time can wear the coating and reduce adhesion over months. Match the plate ratings to your printer and filament specs, clean and maintain the surface regularly, and you’ll extend lifespan and keep prints sticking reliably.
Plate Flexibility & Removal
While a rigid glass bed can feel rock-solid, flexible PEI plates give you a much easier way to get prints off without risking a gouge or a broken part. You’ll bend a spring-steel PEI plate and watch parts pop free, which feels almost magical after wrestling with a scraper. Many plates are dual-sided, with textured and smooth faces, so you can choose stronger adhesion for printing or a smoother side for simpler removal. Flexibility also helps the plate resist warping over many prints, keeping your surfaces reliable. Clean the PEI regularly and don’t pry parts off with too much force, and the plate will stay effective. It’s practical, user-friendly, and saves you time and frustration.
Magnetic Mounting System
Because a magnetic mounting system makes swapping plates as simple as peel-and-stick, you’ll spend less time fiddling with tools and more time printing. You’ll appreciate how quick, tool-free installation guarantees the PEI plate aligns with the heated bed for dependable first layers. Strong magnetic bases hold plates firmly during prints, cutting the risk of shifts that ruin jobs. When a print’s done, the spring steel flexes so you can pop parts off without scraping or damaging the surface — that simple bend is oddly satisfying. Many magnetic PEI options tolerate high temps (up to ~300°C textured, ~200°C smooth), so you can run a range of filaments. Choose a magnetic system that’s durable and reliably centered to keep prints consistent.
Maintenance & Cleaning
Magnetic mounting makes swapping plates easy, but keeping that PEI surface happy takes a bit of regular care. You should clean the plate before and after each print with a soft cloth and isopropyl alcohol to remove oils and residue that hurt adhesion. Don’t use strong chemicals — they can damage the PEI. Wait for the plate to cool before removing prints so you don’t warp the surface or ruin future adhesion. Check the sheet regularly for scratches or wear; small nicks can lead to failed prints and may mean it’s time to replace the sheet. For tricky filaments, try a glue stick on the smooth side — many users find it helps PLA stick better and peel off cleaner.
Long-term Durability
If you want a PEI build plate that truly lasts, pay attention to a few practical details that show up over months or years of printing. Thicker spring steel resists warping and scratches better, so opt for a heavier sheet if you want longevity. Check the PEI coating’s temperature rating — high-quality PEI that tolerates up to 300°C holds up through repeated heat cycles. Clean and maintain the surface gently; mild solutions keep adhesion strong and prevent wear. If you print flexible filaments like TPU, handle the plate carefully since they can scuff the surface. Dual-sided plates with smooth and textured faces give you versatility, and if you care for both sides they’ll stay usable far longer than a neglected plate.
Brand Support & Warranty
When you’re choosing a PEI build plate, strong brand support and a clear warranty can make a big difference in how smoothly your printing goes, especially when something goes wrong. You’ll want a company that answers questions quickly — many respond within 24 hours — because fast help can save print time and frustration. A solid warranty gives peace of mind: if adhesion fades or the plate gets damaged during normal use, you should be able to get a replacement or refund. Check online reviews to see if support is consistently praised or criticized. Also favor brands that provide detailed maintenance tips, troubleshooting guides, and filament-specific advice; those resources shorten your learning curve and help you get better results faster.
FAQ
How Do I Remove Permanent Marker From a PEI Surface?
FAQ 1: What is the best method to remove permanent marker from a PEI surface?
The best method involves using isopropyl alcohol or an oil-based remover. Apply it to the affected area and gently rub with a soft cloth.
FAQ 2: Can I use any type of alcohol to remove permanent marker from PEI?
Isopropyl alcohol is recommended for its effectiveness. Avoid other types of alcohol that may not work as well or could damage the surface.
FAQ 3: Should I scrub hard to remove the marker?
No, you should avoid abrasive scrubbing. Gently rubbing with a soft cloth is sufficient to prevent damaging the PEI surface.
FAQ 4: What should I do after applying the remover?
After removing the marker, wash the area with warm soapy water. This will help eliminate any residue from the remover.
FAQ 5: How should I dry the PEI surface after cleaning?
After washing, dry the PEI surface with a soft, clean cloth. This helps prevent water spots and maintains the surface’s integrity.
FAQ 6: Can oil-based removers be used on PEI surfaces?
Yes, oil-based removers can be effective for removing permanent markers on PEI. Just be sure to follow up with proper cleaning.
FAQ 7: Is there a risk of damaging the PEI surface when removing permanent marker?
If you avoid abrasive scrubbing and use suitable cleaning agents, the risk of damage is minimal. Always test a small area first if unsure.
FAQ 8: How long should I let the remover sit before wiping it off?
Let the remover sit for a short period, typically a minute, to penetrate the ink before gently wiping it off.
FAQ 9: What if the marker stain persists after initial cleaning?
If the stain persists, you can repeat the process or try a different cleaning agent, but always proceed with caution to avoid damage.
FAQ 10: Are there any household items that can effectively remove permanent marker from PEI?
In addition to isopropyl alcohol, you may try using vinegar or a specific commercial cleaner designed for stubborn stains, but always check compatibility first.
Can I Use PEI Plates With Resin 3D Printers?
1. Can I use PEI plates with resin printers?
Yes, you can technically use PEI plates with resin printers, but it is not recommended due to potential damage from resin adhesives.
2. Why shouldn’t I use PEI plates for resin printing?
Resin adhesives and solvents can degrade PEI surfaces, which may reduce adhesion and affect the quality of your prints.
3. What alternatives are recommended for resin printing surfaces?
For a safer option, consider using glass, silicone, or surfaces specifically recommended by the printer manufacturer.
4. What are the benefits of using glass for resin printing?
Glass surfaces provide excellent adhesion for resin prints and are not susceptible to damage from resin like PEI.
5. Is silicone a good choice for resin printing surfaces?
Yes, silicone is a flexible option that can provide good adhesion and is resistant to damage from resin materials.
6. How does resin affect PEI plates over time?
Over time, the exposure to resin can weaken the PEI surface, leading to compromised adhesion and potential print failures.
7. Are there any specific brands of PEI that are safer for resin printing?
Most PEI brands pose similar risks when exposed to resin, so it’s best to avoid using them altogether for resin printing.
8. What happens if I use a PEI plate anyway?
Using a PEI plate may result in poor adhesion, lower print quality, and the potential for damaging the plate, ultimately leading to more issues during printing.
9. Can I clean PEI plates used with resin?
While you can clean PEI plates, the solvents used for cleaning may further degrade the surface, making them less effective for future prints.
10. Is there a way to protect PEI plates if I choose to use them?
There are no reliable methods to fully protect PEI plates from resin damage, so it’s advisable to use recommended surfaces instead.
Are There Health Risks From Sanding or Abrading PEI Sheets?
FAQs on Health Risks from Sanding or Abrading PEI Sheets
1. What health risks are associated with sanding PEI sheets?
Sanding PEI sheets can release fine dust particles that may be inhaled, leading to respiratory issues. Skin and eye irritation can also occur from direct contact with the dust.
2. What protective gear should I use when sanding PEI?
It’s essential to wear an N95 respirator or a suitable dust mask, gloves, and protective eyewear. This gear helps minimize inhalation and contact with harmful dust.
3. Is ventilation important when working with PEI sheets?
Yes, working in a well-ventilated area is crucial. Good ventilation helps disperse dust and reduces the risk of inhaling harmful particles during the sanding process.
4. How can I effectively clean up after sanding PEI?
Use a vacuum designed for fine dust or a wet cleaning method to remove debris. This helps minimize dust exposure and keeps the work area safe.
5. Can inhaling PEI dust cause long-term health effects?
While acute exposure may lead to irritation, prolonged inhalation of fine dust may pose a risk to respiratory health. It’s vital to take precautions to limit exposure.
6. What symptoms should I watch for after sanding PEI?
Look out for symptoms such as coughing, difficulty breathing, skin rashes, or eye irritation. If you experience these symptoms, seek medical attention if they persist.
7. Is it safe to sand PEI sheets indoors?
Sanding PEI indoors is generally not recommended without proper ventilation. Always ensure adequate airflow to avoid dust buildup in enclosed spaces.
8. What should I do if I get PEI dust in my eyes?
If PEI dust gets in your eyes, flush them immediately with water for at least 15 minutes and seek medical attention if irritation continues.
9. Are there specific sanding tools that reduce dust exposure?
Using tools equipped with dust collection systems can help minimize dust generation. Consider using sanders designed for fine material to reduce airborne particles.
10. How can I further minimize risks while sanding PEI?
Besides wearing protective gear and ensuring ventilation, avoid sanding when windy or in areas where dust can easily circulate. Regularly clean your workspace to reduce dust accumulation.
Do PEI Plates Work With Flexible Filament Without Adhesives?
1. Can PEI plates hold flexible filaments without adhesives?
Yes, PEI plates can effectively hold many flexible filaments without the need for adhesives.
2. What adjustments are necessary for printing flexible filaments on PEI plates?
You’ll need to adjust your settings to include a low or no nozzle height, moderate bed temperature, and slower print speeds.
3. Is cooling important when printing with flexible filaments on PEI?
Yes, gentle cooling is recommended to help ensure better adhesion and print quality.
4. Should I use a brim or skirt when printing flexible filaments?
Testing a small brim or skirt can provide extra security and improve adhesion for flexible prints.
5. What bed temperature is ideal for flexible filaments on PEI?
A moderate bed temperature is suggested, though the exact temperature may vary by filament type.
6. How does nozzle height impact printing with flexible filaments?
Maintaining a low or no nozzle height helps improve adhesion to the PEI surface, which is crucial for flexible materials.
7. Are there specific print speeds recommended for flexible filaments?
Yes, slower print speeds are recommended to enhance the quality and adhesion of the print.
8. What types of flexible filaments work best with PEI plates?
Many flexible filaments can work well with PEI plates, but it’s advisable to test specific brands and types for optimal results.
9. Can I use PEI plates for all flexible filaments?
Not all flexible filaments may adhere equally well; some may require specific adjustments or techniques for best results.
10. What are the benefits of using PEI plates for flexible filament printing?
PEI plates provide a reliable surface that can enhance adhesion and print quality, making them suitable for various flexible materials when settings are adjusted appropriately.
How Should I Store Spare PEI Sheets Long-Term?
1. How should I store spare PEI sheets?
Store spare PEI sheets flat to prevent warping, ensuring they remain in optimal condition.
2. What is the ideal environment for storing PEI sheets?
Keep PEI sheets in a cool, dry place, away from direct sunlight to avoid degradation.
3. Should I wrap my PEI sheets for storage?
Yes, wrap them in anti-static or clean paper to protect against dust and contamination.
4. Can I stack items on top of my stored PEI sheets?
No, avoid stacking heavy items on top of the sheets to prevent bending or damage.
5. What humidity level is best for storing PEI sheets?
Keep humidity low, as high moisture levels can lead to warping and affect the sheets’ performance.
6. Is it safe to store PEI sheets near heat sources?
No, storing them near heat sources can cause warping and affect their integrity.
7. How can I prevent contamination while storing PEI sheets?
Use clean wrapping materials and ensure the storage area is free from dust and debris.
8. Can I fold my PEI sheets for storage?
No, folding can lead to permanent creases and damage; always store them flat.
9. How often should I check on my stored PEI sheets?
Regularly inspect your stored sheets for any signs of warping or contamination, ideally every few months.
10. Is there a specific temperature range for storing PEI sheets?
While there is no strict temperature, aim for a stable environment, ideally between 15°C to 25°C (59°F to 77°F).
11. What should I do if my PEI sheets get damaged while in storage?
If you notice any damage, evaluate whether they can still be used or if they need to be replaced to ensure optimal printing results.
Final Thoughts
When it comes to choosing a PEI build plate, you have four excellent options that cater to various printing needs—strong adhesion for those tricky prints, effortless part removal for efficiency, dual textures for versatility, or high-temperature stability for demanding materials. Select the one that best aligns with your printer model and the filaments in your arsenal. If you’re looking for convenience, the flexible magnetic spring steel is the way to go; for those who want different finishes, the Prusa dual-sided plate is your best bet.
Installation is key—do it meticulously and ensure you level the bed properly. Regular cleaning of the surface is non-negotiable to maintain optimal performance. Follow these steps, and you’ll significantly increase your chances of achieving reliable, frustration-free prints. Trust me, the right PEI plate can make all the difference.